

- Harvest recording and delivery
- Harvest recording
- Delivery
- Storage
- Article number – category, product, and article
- Article list (master data)
- Inventory
- Customer management
- Create and edit members/customers
- Create pickup location
- Create share types/subscriptions
- Seed store
- Set up seed inventory
- Seed and transplants order
- Documentation and Statistics
5.1 Harvest recording and delivery
![]()
The data menu provides access to harvest recording and delivery, storage for harvest and goods, the customer administration, the seed storage, as well as the farm documentation and statistics.
![]() In the menu item “Harvest recording”, all sets of the current week which are in their harvest period, are displayed. Further sets with a harvest period close in time can be added. Here you can enter the quantities for each harvest carried out for a set. In this way, they are recorded as stock and can then be allocated in a delivery to customers or to the members of a CSA.
In the menu item “Harvest recording”, all sets of the current week which are in their harvest period, are displayed. Further sets with a harvest period close in time can be added. Here you can enter the quantities for each harvest carried out for a set. In this way, they are recorded as stock and can then be allocated in a delivery to customers or to the members of a CSA.
![]() All created deliveries can be found under “Delivery”. Add customers for each delivery, allocate them the proportional or the total available quantity of all recorded harvests and export the finished planned delivery.
All created deliveries can be found under “Delivery”. Add customers for each delivery, allocate them the proportional or the total available quantity of all recorded harvests and export the finished planned delivery.
5.1.1 Harvest recording
![]()
Enter the quantities harvested in the currently selected calendar week for each set. If necessary, enter a planned harvest quantity, in case it differs from the automatically displayed planned quantity of the set. When deleting the quantity by backspace-key, the automatic quantity is generated again.

Harvest recording overview.
The table shows all sets currently in the harvest period with their harvest dates. You can hide a set, by clicking on the “eye”-Button, on the left of its name.
Planned harvest amount: The first column of Planned harvest amount contains the harvest quantity planned for this week. In the column Total, the harvest quantity to be expected in the entire harvest period is shown. Unharvested, shows the quantity of the set still on the bed.
Harvest amount this week: In case of existing planned deliveries (see point 5.1.2) in the selected week, the entered order quantities “Ordered” are compared with the already entered harvest quantity “Harvested“. Depending on the deficit or surplus of the harvest to the order quantity, a negative or positive available remaining stock “Rest” is output.
Harvest period column: The harvest start, harvest end and harvest duration (planned harvest period) of each set are displayed here.

Add sets to harvest recording.
![]() Add Sets: Sets with two weeks of scheduled harvest time before and after the current week can be added to the harvest set.
Add Sets: Sets with two weeks of scheduled harvest time before and after the current week can be added to the harvest set.
Open the “Add sets” sidebar by clicking on the plus symbol in the upper left corner. Select the sets by activating the checkbox and click on the “Add selection” button. To close the sidebar, click on the green X at the top right or just in the harvest recording table.
![]() Hide sets: On the far left of each set-column is a hide button. Sets that have already been completely harvested and distributed or should not be included can be hidden. The sets are then located in the “Add planting sets” sidebar (plus button top left) and can be added again to the table.
Hide sets: On the far left of each set-column is a hide button. Sets that have already been completely harvested and distributed or should not be included can be hidden. The sets are then located in the “Add planting sets” sidebar (plus button top left) and can be added again to the table.
Harvest recording overview.
Enter harvest amount: Select the desired harvest week using the calendar week switcher. In the row of the set to be entered, under the Harvested column, click on “Enter harvest records” or an already existing value. The harvest record sidebar of the chosen set appears on the right.
Here, each harvesting result can be entered, with date and harvest quantity and thus documented in the harvest list. If several harvests are listed, the total harvest amount of the set is displayed beneath all harvest record entries in the last table row. Harvest quantities can be recorded per crop but also per variety. Select the display mode via the buttons “total” / “per variety” to display the recorded harvest quantities.

Crop recording peppers (per crop).

Crop recording peppers (per variety).
Record harvest entry: If necessary, change the harvest date and/or the unit of measure. Now enter the harvest quantity. Click the green tick to confirm the record of the harvest entry.
In the example, the 4th set of rocket salad (“Rucola 4 Wilde Rauke”, 8 weeks duration of harvest) has already been harvested 2 times in week 52. The harvests were each recorded in the program, a total of 21kg of 30.01 kg total planned harvest quantity, have already been harvested. With 9.01kg still unharvested, the set will be harvested for the last time today. It yields a round 6kg, which is entered in the harvest quantity field of the entry sidebar. After confirming, 3.01kg remains on the field (Unharvested). The remainder (Rest) is displayed negatively, because 42.6kg of the set have been preplanned in deliveries (Column Ordered), but the set only had a real total harvest of 27kg. If the harvest would have been bigger than the ordered 42.6kg, the negative remainder would be displayed positive, and the Unharvested column would remain empty for rocket salad 4, as there is no harvest left on the field.
On the leek set (Porree 1) above, with order quantity of 834 piece, 1240 were harvested in the current week. A remainder of 406 piece of leeks, that has not yet been planned in deliveries, is displayed positively.
Weight conversion: In the settings under Profile, a weight conversion of piece and bunch crops can optionally be activated. This adds the line “kg per piece” with an input field, to the harvest recording sidebar. Each harvest quantity entry will then include the estimated or weighted average crop weight value of a piece or bunch of the crop. The value should be used to determine the total and average delivered weight.
Mobile harvest recording: Harvest entry can also be done directly after harvesting in the field with the mobile version on the smartphone.
5.1.2 Delivery
![]()
The delivery area consists of the overview table (deliveries list), which contains all deliveries already planned with date, and other data of the individual delivery in every line.

Delivery overview.
Create new individual deliveries in the deliveries list and call up existing entries to edit them. To delete an entry, click on the trash can icon on the left above the table, after activating the checkbox far left in the line of the delivery.
![]() Create new delivery: In the deliveries list, create a new individual delivery for the current week, by clicking on the plus sign (top left). In the popup window, first the delivery date can be adjusted for planning in another week. Enter a name for the delivery then and select the customers to be delivered to. If sets in harvest, sets with stock inventory or/and purchased articles from the storage are not required in the delivery, uncheck the box. This way they will not be listed in the new delivery table. Click on “create” to create the new delivery or on “cancel” to the right of it.
Create new delivery: In the deliveries list, create a new individual delivery for the current week, by clicking on the plus sign (top left). In the popup window, first the delivery date can be adjusted for planning in another week. Enter a name for the delivery then and select the customers to be delivered to. If sets in harvest, sets with stock inventory or/and purchased articles from the storage are not required in the delivery, uncheck the box. This way they will not be listed in the new delivery table. Click on “create” to create the new delivery or on “cancel” to the right of it.
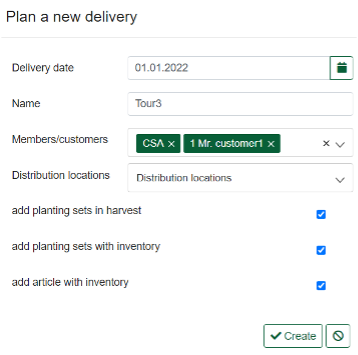
Plan new delivery.
![]() Delete delivery: Click on the trash symbol to delete the delivery entry.
Delete delivery: Click on the trash symbol to delete the delivery entry.
![]() Fix delivery: By clicking on the “open lock” icon to the right of the delivery entry, the delivery is fixed and can no longer be edited. By clicking on the closed lock symbol, the delivery can be unlocked again for processing.
Fix delivery: By clicking on the “open lock” icon to the right of the delivery entry, the delivery is fixed and can no longer be edited. By clicking on the closed lock symbol, the delivery can be unlocked again for processing.
5.1.2.1 Edit individual delivery
![]()
To edit an existing delivery, click on the list entry. You can return to the overview of deliveries by clicking on the “Back arrow” in the top left-hand corner.
Name and date of the delivery are displayed above the table and can be changed there.
![]() The Fix button locks the delivery from changes. It can be unlocked again in the deliveries overview, by clicking closed lock-Button, far right of each table row.
The Fix button locks the delivery from changes. It can be unlocked again in the deliveries overview, by clicking closed lock-Button, far right of each table row.
Add/remove customers: Click on the customer selection menu above the table and select one or more customers by using their checkbox. The customer columns of all customers selected, will appear in the list. To remove a customer from the list, uncheck the box. All order quantities for the customer will be lost!

Add or remove customers.
Delivery performance: To keep the delivery up to date, continuous communication with the database is necessary. Due to CSA and many customers, longer loading times can therefore occur in a delivery. We recommend, to make consumers and goods/article selection only as large as necessary. If possible, split large deliveries into two or more deliveries, if you have low performance.
Collapse/expand customers: For more clarity of the delivery table, customer columns can be collapsed. Click on the small arrow in front of the customer´s name to close and on the arrow at the top of the customer to expand again. In the example illustration, the CSA column and the quantity column are also collapsed. The latter then only shows the remaining quantity column (Rest), so that a comparison with the remaining quantity still available is possible when entering the order quantities of customers.

Collapse and expand customers in overview.
Create commodity groups: Use drag and drop to group wares and crops with the same name. By clicking on the three grey dots (far left of entry-row) and holding down the mouse button, you can grab a list entry and drag it onto another entry. Be sure to drop in the crop/ware column. This way both sets/articles will be grouped under the crop/ware name. To remove an entry from the group, drag it all the way to the left to the narrow first table column. The entry will be then displayed separately. Quantities of commodity groups in CSA and customer columns are summed up, in the parent crop/ware group field.
![]() Click on Add Sets/Articles to open the sidebar. Here your crop sets or purchased goods are displayed. Click on the corresponding tab (Sets or Purchase).
Click on Add Sets/Articles to open the sidebar. Here your crop sets or purchased goods are displayed. Click on the corresponding tab (Sets or Purchase).

Add planting sets to current period.
Add Sets: The Add planting sets tab is the default tab, when opening the sidebar. This list displays all sets, with up to 2 weeks before and after harvest time, in relation to the current delivery week. If sets, you have hidden from the delivery, are in the 2 weeks before/after period, they will be displayed here. Use the search field and activate the filter to quickly find crop names or crops marked with #tags in the table.
Add articles: Here you will find all additionally purchased articles from the storage master data, that are currently not displayed in the delivery. There is also a search field and filter here. You can filter by category, goods, supplier, origin and #tags.
Add Set/Article by drag n drop: Drag an entry by clicking on the three dots at the far left of the set/article row, and holding the mouse button. Drop it on an entry in the crop/ware column of the delivery table. The new entry is subordinated to the crop if it has the same crop name, if not, it is included in the delivery as a separate entry. Drop on subordinated entries, to add.

Add sets and articles in spreadsheet overview.
Crop/Wares, Set/Article and Amount columns: Crop/Wares contains the name of the crop or ware. The set/article lists the set(s) of a crop or one or more articles for a commodity. The “hide” button (crossed eye), to the left of the set/article name, hides the entry from being displayed in the list. Collapse Amount column by clicking the small arrow to the left of the name. The latter then only shows the remaining quantity (Rest) column. Click on the arrow again, to expand.
The Amount column contains the following subcolumns with the values described:
- Unit: maintained in set-creation (may be different for harvest entry), or in the article.
- Planned: planned delivery quantity – value edited at the set, or manually filled
- Available: current crop stock minus quantities planned in other deliveries
- Ordered: sum of set/article quantities planned, from all deliveries
- Remainder: available remaining quantity, that can still be distributed to customers (Available minus Ordered)
Enter customer order quantities: Manually enter the customer´s order quantities (target/is).
Target and Is: It is sufficient to fill in the planned target values of an order in the “Target” column, these will be automatically transferred to the “Is” field. Click in the “Is” field to change the “Is” quantity if it deviates from target (e.g. cause a customer has reordered at short notice).
Fast input: Without a lot of scrolling, you can quickly enter the order quantities by clicking in the first field and then using the Tab key to jump through the table fields one after the other. Just type in ordered quantity inside the field “Target”, corresponding “Is” field will get the same number. Only if “Target” and “Is” differs, fill in the Is-Quantity separately. Collapse customers who should not get any quantities to skip them with Tab key.
Special feature customer “CSA” (farmtype CSA only): If selected “CSA” in customer menu, required quantities, based on the number of member shares stored in the current period, are automatically filled in for the current delivery. Instead of target and actual quantity (Is), for CSA the columns “Distribution”, to display available quantity for distribution and “Total” for total quantity of delivery, are planned at all pickup locations. The quantity in the distribution field is automatically determined from the “required harvest quantity per share” for sets and from the stored “quantity per share” in the article master data for purchased articles.
If CSA is selected, a pickup-station menu appears next to the customer menu. Here you can select the stations to be delivered. The menu selection/deselection works the same way.
Pick-up locations and share types in the delivery: If the CSA columns are not all expanded, the selection/deselection of pick-up locations can only be recognized by change in delivery quantities. Expand them before edit quantities for pickup locations as follows:

Change quantities for different pickup locations (in CSA).
Change quantities for pickup location: By entering manual values in the “All pickup locations” column, the delivery quantities can be adjusted equally for all pickup locations.
To change the quantities for one specific pickup location, open the share type columns for that pickup station. Enter the quantities to be changed manually. The total delivery quantities for the station and in the CSA “Total” column are then automatically adjusted
![]() Click on the arrow icon at the top right of the CSA column. Another column “All pickup locations – quantity per share type” appears. Close by clicking on the arrows again.
Click on the arrow icon at the top right of the CSA column. Another column “All pickup locations – quantity per share type” appears. Close by clicking on the arrows again.
Now click on the arrow symbol in the column All pick-up locations. This will display all created pickup locations in a separate column with the total quantities to be delivered.
Click on the arrow symbol in the column of a pickup station to expand the quantity per share type for the specific station.

CSA: manual and automatic quantities.
Manual quantity entries are displayed with a blue border.
Click the calculator, to perform the automatic calculation for the CSA quantities of a set or article. If manual quantities were entered at the share types, they will be overwritten again with the initial values from the Distribution column. This also resets the planned quantity to the initial value.
The pickup station buffer is a security calculation on every delivery quantity. Edit it in the pickup station column above the name. If a default-buffer is maintained at the pickup station, it can be changed for the individual delivery. The buffer in % is added to all delivery quantities of the pickup station as a reserve. It can only be edited for the current delivery. Change default value in the pickup station details.
5.2 Storage
![]()
You can access the storage by clicking on “Storage” in the data menu. Manage your harvest and ware stocks here and get a good overview of the incoming and outgoing goods.
In the storage, purchased and own processed articles, are created and managed. It´s important to distinguish between these created “articles” and the sets from the crop planning, which have a current crop stock. The sets are only displayed in the stock list of the storage and have no master data. That´s why they never are in the Article list and contain no article number.

The storage consists of two main views, Inventory list (default view) and Article list (master data). The inventory list shows all purchased items and all sets with inventory quantity and all items that are scheduled in a delivery. The article list contains all the article master data for your assortment of goods (purchased goods and own processed products). Click the buttons to open the respective list.
When an article stock is entered in the storage, the article is displayed in the inventory list. Sets appear in the inventory list when a harvest is entered. From the stock list entries of recorded quantities of items and sets, deliveries can be created to all maintained customers or CSA members and pickup locations.
5.2.1 Article number – category, product, and article

Article Sidebar.
The number of an article is required for the clear identification of its goods movements and delivery quantities in the program. For the storage, an automatic assignment of article numbers is integrated. Alternatively, you can assign an article number freely, e.g., if there is already an existing number logic in your warehousing, or if you prefer a different logic.
Auto article number: The automatic article number is created by selecting or entering the category, ware and article and the number of article variants, (e.g., 05.01.001.01).
The first two digits are generated from the categories. 01 to 06 are already preset as follows: Vegetables = 01, Fruit = 02, Dairy products = 03, Meat = 04, Baked goods = 05, Dry goods = 06 Further category numbers are generated continuously, when new categories are entered.
The next two digits stand for a commodity (ware), e.g., bread. The number would then be 05.01 for category 05 (bakery products) and first entered product 01 under category 05.
The three digits after the commodity code stand for the article, e.g., the bread type “rye bread”. The number is then 05.01.001, for the first article created under the commodity “bread”.
The last two digits stand for the same articles with different characteristics, e.g., carrots of the same variety with different units (bundle and kg). Or rye bread from different bakers or suppliers or with different country of origin.
Article number freely assigned:

Freely assign article number.
If the checkbox is enabled, an article number can be entered as desired in the master data of each article (special characters and letters allowed). This deactivates the automatic numbering at category, ware and article. The free input overwrites an already automatically assigned number and remains, even if the “free assigned” checkbox was removed again. By deleting the freely assigned number the automatic can be reactivated. You will be asked whether the current (freely assigned) master data should really be overwritten. Confirm, and the article receives the automatically assigned number again.
If an automatically assigned new number already exists in the old assortment (before using the crop planner), it can be used further by “freely assigned”. An example: If the crop planner has given the purchased “Sour cucumbers” the number 08.01.001.01, but this number has been used for 20 years in the farm shop for a delicious cake according to grandma’s recipe, freely assign the number. Then “Delicious cake” can contain the same (but freely assigned) number as “Sour cucumbers “.
5.2.2 Article list (master data):
The article list shows all articles, that are not grown as a set on the farm and are therefore not transferred to the stock inventory list via harvest recording. It can be purchased goods, e.g., bread, which is sold through a sales channel or distributed to the members of the CSA. It can also be the own jam or juice from own fruits.
The master data is created in the storage, so that an entry can be made in the inventory list when the wares are delivered from a supplier.
![]() Enter article master data: Click on “create new article” to create a new article entry. In the opened article master data sidebar, the data of the article can now be entered. The sidebar has three tabs “Article”, “Notes and #Tags” and “Inventory Change”.
Enter article master data: Click on “create new article” to create a new article entry. In the opened article master data sidebar, the data of the article can now be entered. The sidebar has three tabs “Article”, “Notes and #Tags” and “Inventory Change”.

In the article tab you enter all master data of the article, which should be displayed in the stock and delivery tables later. If you want to use the automatic assignment of article numbers, select category, ware and article, or enter your own descriptions for them and click “create”.
For example, you want to sell Christmas trees that a neighbor has grown for you. They are not available in your crop plan and can´t therefore be displayed as set in stock/delivery.
Enter the category “woody plants” that does not yet exist and click on “create”. The selection is now saved under the next possible category number and can be selected as a category in the selection menu. You proceed in the same way in the ware field. Enter e.g. “fir” there, and click “Create”, thereby the article number is assigned. In the article field you enter “Nordmann fir” and click “Create”. The new article is now listed in your article list.
Now fill in all other master data fields: The available stock of the article cannot be edited in the master data sidebar, but a quantity available, will be displayed. Select the appropriate unit for your ware, e.g., for bread grams, kilograms, or pieces (for the fir). Enter a PU (packaging unit), (e.g., bread with unit pieces is delivered in a box with 10 pieces of bread; then VPE = 10). Enter brand, supplier, and origin (the fields work the same, as described above for category, product, article).
Shown for CSA only: Enter a planned amount per share and, in the case of pieces/bulk wares, a weight specification.
The master data is now completely entered for the article and will be saved, by closing the sidebar.

Create article category.
In the Notes tab, store your #tags for sorting and annotations in the notes field, as in the other areas of the program. In the article sidebar, however, there are two additional, scalable note fields, e.g. for product information about the article.
The article tab Stock Change is similar with the one on the set. Here, the remaining stock of an article, that has been disposed of, can be deleted too, and is then displayed in the Reject column of the stock change table. All inputs and outputs, and rejects are displayed in the table sorted by calendar weeks and date.

Article form: notes and tags.
![]() Enter article inventory: Click on the button to enter a new item stock.
Enter article inventory: Click on the button to enter a new item stock.
![]()
Copy articles: For a quick creation of similar articles, copy them. Click the box on the far left of the entry in the article list, then click copy button above the list or in the article sidebar (upper right corner). The article will be copied with all its master data and added to the list as a new entry, with the next possible last digit of the article number.
Delete article: Click on the trash can icon to delete one or more selected items. Confirm if you are sure – all data will be lost!
![]()
Search and filter: With the search you can narrow down the list to your search term. Enter your request in the search box at the top right of the list. Filter by item number, category, crop/wares, brand, supplier, origin and #tags. Click on “Reset Filter” to display the entire list again. Click on “Close filter” to close the sidebar.
5.2.3 Inventory
Articles in the inventory list: The list is structured in the same way as the master data list and shows all items with currently available stock. In addition, all items that are scheduled in a delivery and therefore have a negative A-stock (=available stock displayed in column “Available”) can be found here. Articles are only displayed here, after stock has been entered for the first time. For articles/sets that are not scheduled in deliveries, the entries are automatically removed from the stock list when the stock has fallen to zero. In the stock list, articles/sets can only be edited, copied, and deleted via the article or set sidebar, but not directly in the table.
To open the set or article sidebar, click the link in the item column. To go directly to the inventory, change tab of a set or article, click on the number in “Available” column.
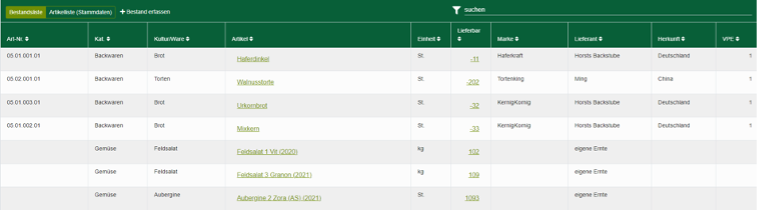
Inventory.
![]()
Enter inventory of article: Click the button to open article search. Then select a category or product from the fields. If there is only one article as a search result, the program jumps directly to the article sidebar. If there are several articles, they will be offered in the selection menu and in a table below. Click on the article whose stock is to be recorded. The article sidebar opens.
Create new article: If an article is not available in the search, click the button in the upper right corner to create the new article.

Enter new inventory entry.
Article sidebar: If an article is available in the article list (master data), the article sidebar is opened. The structure is similar with the article master data sidebar, with the difference, that master data cannot be changed, but stock can be entered here.
Enter stock: Select the date, if the wares receipt was not on the same day of entry. Enter the quantity in the field “enter inventory” and confirm the entry by clicking on the green tick.
Delete stock: If part or all stock is to be deleted, e.g., because a part of it has spoiled, enter the quantity in the “delete inventory” field and confirm by clicking on the green tick. The deleted quantity is documented in the reject in the tab stock changes.
Do you want to delete the stock because a wrong delivery was detected after the entry? Then switch to the “Stock Change” tab and delete the quantity received in the lower table. If quantities of the item are/were already planned in a delivery, the item must first be deleted from the delivery, to delete the quantity received.
Article Sidebar for new entries.
Sets in the storage: In addition to the purchased articles, all sets with recorded harvest and positive stock are displayed in the inventory list. The master data comes from the set in the crop plan and therefore does not have to be stored in the master data area of the storage. Therefore, sets only appear in the inventory list and never in the article list.
![]() Search and filter: Type in a search term, to narrow down the list to it. Open the Filter by clicking on the “funnel” icon, to filter by item number, category, crop/wares, brand, supplier, origin and #tags. Click on “Reset Filter” to display the entire list again. Click on “Close filter” to close the sidebar.
Search and filter: Type in a search term, to narrow down the list to it. Open the Filter by clicking on the “funnel” icon, to filter by item number, category, crop/wares, brand, supplier, origin and #tags. Click on “Reset Filter” to display the entire list again. Click on “Close filter” to close the sidebar.
5.3 Customer management
![]()
The customer area opens by clicking on “Data” and selecting “Members/customers” in the navigation bar. It contains three sub-areas – the Members/customer administration, which is open by default, and the areas distribution location and share types/subscriptions.

Customer table overview.
In each of the three areas a list is displayed where you can create and edit entries. To search the list, click on the search field at the top right and enter the search term. Editing list entries is done via a sidebar on the right side of the screen.
![]()
reating a new list entry: Click on “Create” to create a new customer, distribution location or share type. The side menu for editing the new entry opens automatically. To enter data, open the respective menu item (address, distribution location, bank details, #tags and shares) by clicking on it.

Edit an existing list entry: Click on the appropriate line in the list and click on the “pencil” icon in the side menu. This makes the customer data editable.
Important: In the customer area, entries are not automatically saved!
![]()
Delete entry: Open the entry and click on the trash can in the top right sidebar. Confirm the confirmation prompt to delete the entry from the list.
To save changes to an entry, the Save button at the top right of the respective sidebar must be pressed.
5.3.1 Create and edit members/customers

In the category “Members/Customers” the customer file is displayed. All customers, who are to be included in deliveries, are stored here. In the case of solidarity farming, the members can also be entered here and optionally one or more shares and the #Tag CSA can be stored.
Each customer entry contains the customer’s contact details, if applicable an assigned pick-up station or a delivery address that differs from the customer’s address. In addition, if applicable, bank details, #tags for displaying a customer group affiliation and, in the case of the “CSA” farm type, the additional section membership “shares”.
![]()
Create members/customers: Open the sidebar by clicking on “Create” or on a list entry. For the latter, click on the “pen” symbol in the menu to enter or change data.
Address data: Enter the customer’s contact details.
CSA Distribution location/delivery address: To assign a pickup location, select it from the drop-down menu. To use a delivery address of the customer, check the box next to “Use delivery address”.
Bank details: Enter the customer’s bank details.
#Tags: Under “already used #tags” the following customer groups (CSA, restaurant, shop, market, cooperative member) are available. Click on one or more of the predefined #tags (highlighted in blue) to assign the customer to a customer group. To create a new #tag, enter the name in the input field and confirm with Enter. The new #tag is now assigned to the customer (green #tags) and will be added to the list of existing #tags (blue). Assigned (green) #tags can be removed by clicking on the small X to the right of the #tag name, in edit mode.
Shares (only for CSA): Here you can determine how many shares are allocated to the customer in which share type(s) or subscription.
Create a new share entry: Define a period by setting start and end calendar week (CW) and year. Specify the number of harvest shares, ordered for the customer during this period. Assign the appropriate share type to the customer. Click on “create” below, to accept the entry. Create another entry with a new period if the number of shares changes, or the period is extended.
Manage share entries: Existing entries are displayed under the share investment field, by clicking on the “plus” to the left of the respective share type or subscription.
You can delete an entry by clicking on the trash can icon.

Member / customer creation in the sidebar form.
IMPORTANT for CSA-Farmers:
#Tag “CSA”: If a customer is assigned to the tag “CSA”, this customer is no longer selectable as a customer in the individual delivery. Delivery quantities can no more be assigned to him. Due to the #Tag, he belongs to the group “CSA”, whose delivery quantity is determined automatically on basis of the current number of shares.
The option “Use delivery address” is not available for customers with the #Tag “CSA”.
Customer file not mandatory! The member shares can be assigned to each CSA customer. However, the number of pickup members and share types can also be stored at created distribution locations.
Farm type “CSA” – shares: The number of harvest shares is required for the quantity calculation of the plants, bed meters and the harvest. If no shares are maintained, the crop planner issues a corresponding error message during set planning. Changes to the number of shares lead to a changed harvest and plant requirement (message & marking on sets)!
 Export of the customer file: To create an Excel export of the customer data click on the button.
5.3.2 Create pickup location

The pick-up stations list shows all created delivery locations with their address and pick-up persons (number of members). In addition, the selected share types of the collectors are displayed in separate columns. A standard pick-up location is created by the program and cannot be deleted. Further pick-up locations can be created, as follows.

Create new pickup locations overview.
![]()
Create new pickup location: Open the sidebar, by clicking on “create” and click on the “pencil” symbol in the menu, to enter or change data. To edit created pickup locations, click on a pickup location entry in the list.
Pickup location address information: Enter name and address.
Contact person: Enter name and contact of a person responsible for the pickup location.
Details: Under Details, a security surcharge of the delivery quantities in % can be stored for the pick-up location. This will be taken over in every delivery by default.
Shares: Assign a specific number of shares to the pickup location in addition to, or if they are not to be assigned directly to the customer. Shares/subscriptions created at the pickup location can be deleted by clicking on the “trash can” button displayed on the right of each entry.

Create new share entry.
Create a new share entry: Set start and end kW/ and year and specify the number of harvest shares to be delivered to the collection station during this period. Assign a share type for each entry. Click on “create” below, to accept the entry. Create another entry with a new period to change the number of shares.
Manage share entries: Existing entries are displayed under the share investment field, by clicking on the “plus” to the left of the respective share type/subscription. By clicking on the entry, you can edit it, or delete it with the trash can icon.
Shares that have been assigned to the pickup location at the customer, cannot be deleted here and are marked with the “customer” icon. Navigate to the customer details to modify or delete them.
5.3.3 Create share types/subscriptions
 In this list you can create share types for CSA members or subscriptions for customers of your subscription box, i.e., different order options that members or customers can book in your offer.
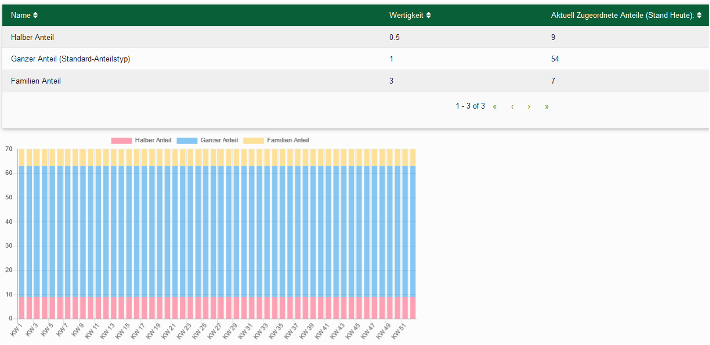
![]() Create new share type: Click on “Create” to create a new entry. Each share type/subscription package is assigned a name and a value. “Value” is the share type calculation factor for the delivery quantity calculation of the individual crop/ware quantities for CSA or subscription box. With a Value of 1 (predefined in the standard package), one portion of the “required quantity per share” (and unit piece or weight) maintained at the set, is packed per customer or member share from each harvested vegetable. For example, this would be 1 kg of tomatoes per M share (value =1) or 0.5 kg per half share (value = 0.5).
Create new share type: Click on “Create” to create a new entry. Each share type/subscription package is assigned a name and a value. “Value” is the share type calculation factor for the delivery quantity calculation of the individual crop/ware quantities for CSA or subscription box. With a Value of 1 (predefined in the standard package), one portion of the “required quantity per share” (and unit piece or weight) maintained at the set, is packed per customer or member share from each harvested vegetable. For example, this would be 1 kg of tomatoes per M share (value =1) or 0.5 kg per half share (value = 0.5).
Neuen Anteilstyp anlegen mit unterschiedlichen Wertigkeiten.
Rounding for piece crops: Non-integer values cause the number of pieces to increase, as the required quantity is rounded up to the next higher integer. The program therefore rounds up half a cucumber to 1 cucumber, as piece goods are not usually delivered in half.
Example for a newly created share type would be package name “XL” or “Family share”, with valence “3” (persons). In the same way, a package “Gastronomy” with valence “20” can be created if several seasonal restaurants are supplied.
The list of share types shows the share type name, the value, and to the right of it, the corresponding current number of customers or members assigned shares/subscription of each package.
Proportion type distribution in the current year: Below the table, the planned proportionate package distribution for each calendar week is displayed graphically. By clicking on the box above the graphic, you can show and hide the share types. Point with the mouse on one of the bars, to display the evaluation of the selected week. This makes it easy to track seasonal changes in the number of shares during the year.
5.4 Seed store
![]()
You can access the seed store via the “Data” button in the navigation bar. Here you can carry out seed inventory and order management, for quick calculation of the transplants and seed order-quantities.
Select the menu item “Seeds”. A list of all crops and their varieties, created in the crop master data, appears.
The buttons above the list can be used to calculate the requirement for seed quantities of all maintained crop varieties and to export seed inventory.

Calculate seed demand.
Click on a crop line to open or close the variety view. All varieties already created are listed (create new varieties in the crop master data).
You can edit individual variety entries, by clicking on a variety line in the detailed view. A table appears, in which the seed stocks can be managed. To delete the seed entry, use the “trash can” button.

Add seed varieties.
5.4.1 Set up seed inventory
Create a new seed entry: Click on the “Plus” to the left of the green line next to the year of manufacture.

Create new seed inventory.
If variety data are already stored in the crop, they are displayed with the year for selection. For a new entry, select “Create seed data“. Fill in the fields “Year of manufacture”, “Manufacturer”, “TKG” and “Stock”. The number of grains is calculated from the TKG and stock information in the “Number of grains” column.
Complete seed entry: Click on the box under “completed” to hide the seed entry from the previous year or the current entry after the seed order has been completed. The entry will then no longer be included in future seed orders. To display all entries again, activate the “Show all” checkbox above the table.
Then close the variety detail view by clicking on the row with the crop name to save the entries. To delete the entry, click the trash can icon on the far right.
Take over seed data from the crop planning: By clicking on the “Plus” for a new seed entry, existing data, if available, will be offered in the menu, in the example above the seed entry eggplant – 2021 (own propagation). By selecting an entry, the variety data is imported from the master data of the crop.

Seed entry overview.
5.4.2 Seed and transplants order
Create seed order: Once all varieties, required for the next season’s crop, have been maintained in the seed store, the seed order can be calculated. A click on the button “Calculate demand” opens the order-list.
![]()
Transplants per box in case of additional purchase: For the calculation of the transplants, the number of transplants per box must be maintained on the set for all crops purchased off farm!
Calculate demand by day: To create the list for transplants with ordering calendar weeks and days, use “Calculate Demand by Day” instead of “Calculate Demand”.
Export order-list: After reviewing, export the order to Excel by clicking the “Seed inventory xlsx” button.
Mark seed entries as completed: Open the seed entries of a variety in the variety list of the seed store. Activate the “done” box on the right of the seed entry. Now it is no longer displayed and not considered in the order calculation.
To show/hide completed entries, use “Show all” box on the left.
5.5 Documentation and Statistics
![]()
Here you can access the operational documentation and statistics. Under “Data” in the navigation bar click on “Documentation and Statistics”. The farm statistics for fields and crops are displayed. It contains five areas (Fields, Crops, Yield, Nursery and Tasks).
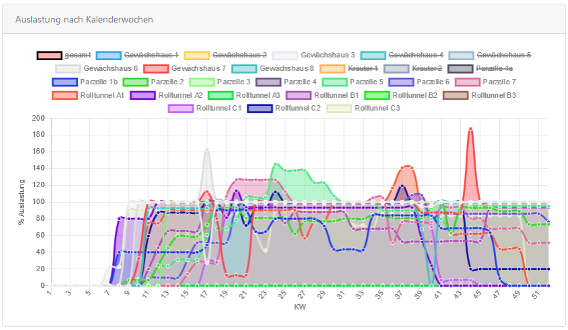
 Fields statistics: The table lists all fields with number of beds, area size and division, occupied bed metres and area as well as the resulting percentage utilisation. Values > 100% can be explained by multiple occupancy of crop sets with temporal overlap. In the bottom line of the table (“total”), the totals are displayed for all columns, except for the last column “utilisation”. Here, the average of all utilization values is given.
The assignments of individual fields can be opened by clicking on the table row of the field. With a click on the field name, you get to the field view.
The chart below the table shows the percentage utilization of all fields over the year. Click on a rectangle in the legend above the chart to show or hide it.
Schläge-Statistik: Zeigt alle Schläge mit Beetanzahl, Flächengröße/-aufteilung, belegte Beetmeter und Fläche sowie die sich daraus ergebende jährliche Auslastung der geplanten Kulturensätze.

Crop statistics: The pie chart shows the percentage of bed meters of each crop to the total available bed meters of the farm.
The associated table shows the values of the crops on which the diagram is based. It shows the number of sets and their total bed metres and the proportional percentage bed metre requirement of the sets of the crop).
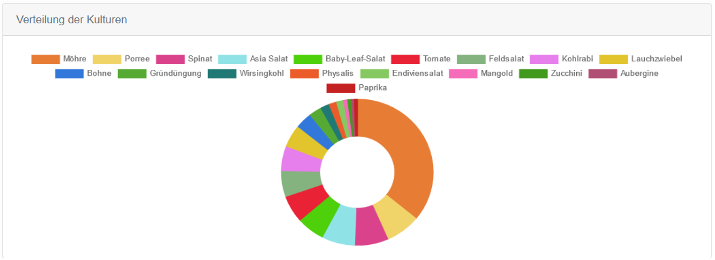
Kulturen-Statistik.
 Yield statistics: This table shows the total harvest quantity in relation to bed metres and cultivated area. In addition to bed metre and area yields, the time of crop and average crop periods (crop, bed crop period, harvest) are given for each crop.
By clicking on the number of sets in brackets, a list of all sets planned for the respective crop in the crop year are expanded. Sets with missing data are displayed in red, as the statistical calculation cannot be performed here.
 Nursery statistics: In the nursery area statistics, the first column of the table shows the number of sets with nursery of the current year and the calendar week with the highest simultaneously existing number (amount) of sets. Column two shows the week with the highest number of multi-pot plates used and the week with the highest area use for nursery. In addition, here the volume of all multi-pot plates is calculated, and the substrate requirement needed for the entire nursery of the year is determined.
The upper diagram shows the space utilization for planted multi-pot plates or other growing containers over the entire growing year.
In the diagram below, the number of multi-pot plates required over the year is shown for each calendar week. This allows the plate requirement to be read off. Peaks in the planning can also be identified and reduced.
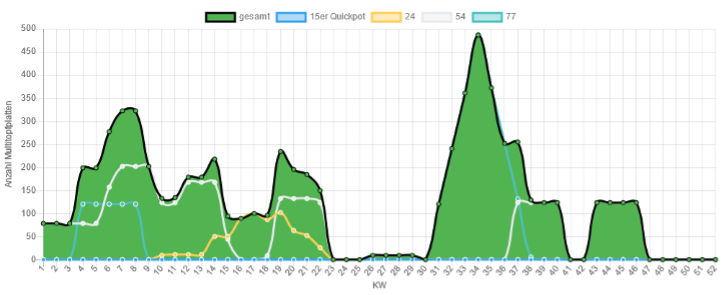
Anzucht-Statistik.
 Tasks statistics: The Tasks tab contains all the tasks stored in the system for the selected crop year, with the number of sets on which the task was stored and the total time required for the task. The tabs Crop, Sets, Fields list the tasks assigned to each of these. Tasks notes sets/fields shows all tasks with notes at a set/field. Tasks Notes without reference shows all tasks with notes that are not assigned to a set or field.