

- Create sets
- Crop Calendar Filter & Sort
- Edit the crop plan
- Move sets – crop time changes via drag and drop
- Calendar Week Statistics
- Open set details
- Edit set details
- Actions at planned set and bulk processing
- Quantity Planning
3.1 Create sets
![]() You can access the Crop Calendar by clicking on the icon in the navigation bar or the “Show Crop Calendar” button in the Dashboard. The Crop Calendar view shows the crop plan with all planned sets for the selected season (year shown in the navigation bar).
You can access the Crop Calendar by clicking on the icon in the navigation bar or the “Show Crop Calendar” button in the Dashboard. The Crop Calendar view shows the crop plan with all planned sets for the selected season (year shown in the navigation bar).
![]() Click on the selection arrows to choose a previous or following year to be displayed in the crop calendar.
Click on the selection arrows to choose a previous or following year to be displayed in the crop calendar.

Graphical Calendar Overview.
The graphical crop plan contains the crop and variety names of the sets on the left. The timeline is shown in the table-header, with months and calendar weeks (CW). The current month and calendar week are highlighted. Clicking on the week opens the calendar week statistics.
Sets are shown as colored bars with either one (grown transplants for sale), two (direct-seeding crops and ordered transplants – seeding/planting and harvest) or three time periods (sets with grown transplants – nursery, growth, and harvest).
By selecting the check marks at the beginning of the line, individual sentences can be marked and edited.
Crop calendar
![]() „Reload“ to show edited planned sets.
„Reload“ to show edited planned sets.
![]()
“Undo”: To undo the recently performed action, corresponding action can be selected here.
![]()
„Create sets“
![]() Spreadsheet crop calendar export: Create a spreadsheet export of your entire or filtered crop calendar view. Click on “export crop calendar” to print your crop calendar directly from a spreadsheet.
Spreadsheet crop calendar export: Create a spreadsheet export of your entire or filtered crop calendar view. Click on “export crop calendar” to print your crop calendar directly from a spreadsheet.
![]() Actions to edit sets:
Actions to edit sets:

Access the spreadsheet view by clicking on the button „spreadsheet“ (in the middle, top position). Instead of the usual calendar view, it shows the underlying data of all planned sets.
![]()
Show/hide columns: Selection of the table columns to be displayed.
![]() To create a cultivation plan, click on the “Plus” sign in the upper left corner.
To create a cultivation plan, click on the “Plus” sign in the upper left corner.
Create a cultivation plan for multiple crops.
To create sets in the Cultivation Calendar, click the “Plus” sign at the top left. Select a crop from the “Own crops” section in the menu to go directly to the record creation.

![]()
Create sets in the Crop Calendar, by click on “Plus” icon at the top left. Select a crop from “own crop” section of the dropdown menu. If you want a crop not available under “own crops”, choose one from the bottom “template” sections or enter the name at the top and click “create”. This opens a window for crop master data creation. Enter or adjust the data and press “Continue”. This saves the master data in the crop section and leads you to the set creation window.
You can switch between creating sets of “Multiple Crops” or “One Crop” and populate your growing calendar accordingly.
![]()

Crop data and planning settings for the new sets are displayed here. First select the number of sets you want to create. Then choose the start-date and select a start point from sowing/breeding/planting/harvesting date). Select a variety if you like. Check and, if necessary, change the preset crop data.
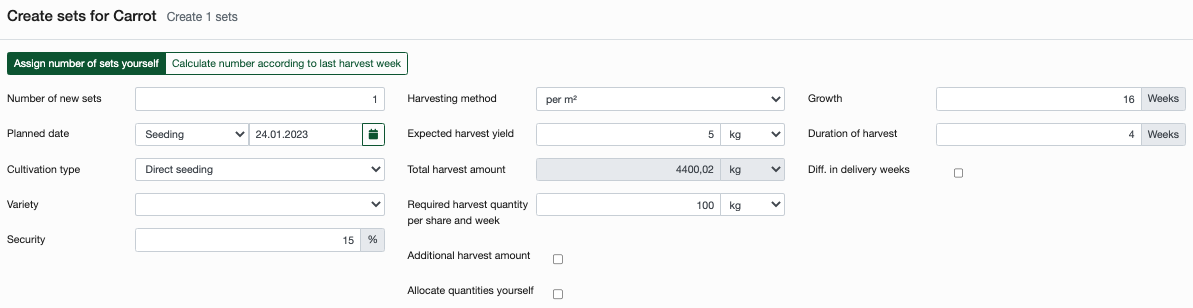
Create sets (form).
Continuous harvest or weeks in between: When creating multiple sets, the “Continuous harvest” option is active by default. This means, the harvest end of the first set is scheduled as the harvest start of the second set, and so on. Uncheck the box if you don´t want to schedule the sets with Continuous harvest. An input field for the “Number of weeks in between” appears. Enter the time interval between the harvests of the sets in weeks manually.
Security and germination rate: The security indicates the estimated plant failure during the bed culture. Starting from 0%, a percentage is added to the required number of plants of the set (e.g., 15% more than required).
The germination rate is also a safety buffer in planning for crops, of which transplants are grown on the farm itself. It assumes 100% (=100% of the seed germinates). In the case of purchased seed with a germination capacity specified, this value can be adopted (e.g., 85% germination rate). Otherwise, an experience/estimate value should be entered, or a germination test should provide information on the germination capacity of the seed. The seed/transplants quantity is increased accordingly to compensate for the failure.
Now select the desired harvesting method that suits the crop. For the harvesting methods “per m²” and “per plant and week”, an additional input field “Expected harvest amount” appears. Enter the estimated yield of the crop per m² or per plant and week here. Enter the required harvest quantity per week (for CSA quantity per share and week) next. If an additional harvest quantity is to be planned, fill in the field “additional harvest quantity”.

Harvesting details (method, expected quantities, etc.).
CSA only:Operated with system “Market-Garden” or “Commercial vegetable growing”, the calculation of the number of plants and bed meters is always displayed. With “CSA” the calculation is based on the number of member shares. To display the plant and bed meter requirement, activate the box “Assign quantities yourself”. Activate “Additional crop quantity” if, for example, the crop is still to be grown for another sales channel.
![]() Calculation of plant quantities and bed meters are carried out automatically from the crop data and displayed by a green calculator. To check the calculation, hold the mouse pointer over the number field “Number of plants” or “Bed meters”. A tooltip window appears with the calculation method and explanations of the current calculation.
Calculation of plant quantities and bed meters are carried out automatically from the crop data and displayed by a green calculator. To check the calculation, hold the mouse pointer over the number field “Number of plants” or “Bed meters”. A tooltip window appears with the calculation method and explanations of the current calculation.
Manual entry of number of plants or bed metres: If required, one of the values can be freely assigned when creating the set. For sets already created, a change can be made in the set details. The calculator symbol turns yellow and the input field containing the manual value is framed in blue, if a manual entry exists.
A click on the calculator triggers the automatic calculation and replaces the manual input (calculator is green).
If you do not want the number of plants and bed meters to be calculated automatically, ((CSA only:) click on the box “Allocate quantities yourself” and) enter your planting quantity or the bed meter requirement manually.


Selection of a default bed length: Select half, whole or multiple of the bed length that is stored under Bed length (default) in Settings/Area parameters.
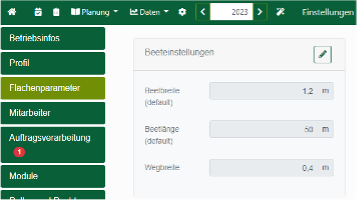
In the example the bed length (default) is 50m. To create a set for two beds, click on “2x bed length” in the selection menu and plan the set for 100 bed meters.
Time in nursery and crop periods: Plan sets with time in nursery, that match the season. The crop time is only displayed for sets with nursery on-farm.
Different delivery weeks: When selecting the harvest method “single harvest” or “per m²”, click on the box “Diff. in delivery weeks” to enter a number for the delivery weeks deviating from the harvest duration. This can be useful if storage harvesting with longer-term delivery is planned (e.g., storage cabbage: 1 harvest week, 20 (diff.) delivery weeks planned). Then the harvest requirement is calculated with the 20 weeks and not with the harvest period of the set. Another example could be an asia-salad, which is cut and delivered 3 times in six harvest-weeks.
When creating a record, you can specify differing delivery weeks. In addition, you choose whether you cut or stock this variety after harvesting it. You can also choose specific calendar weeks, where deliveries can be made. This is relevant, for example, for quantity planning (described below, see 3.5 Quantity planning), as different delivery weeks can be specified for stored vegetables. If the record is changed to “cut”, the planned delivery weeks are overwritten and the delivery weeks correspond to the planned harvest weeks again.

To (de-/)select task templates, that should (not) be assigned to the set, (de-/)activate the box at the displayed task templates (not possible for the standard tasks “Sowing”, “Growing” and “Planting” generated by the program).
![]()
Below that, you can mark your set with new or already used keywords (“hashtags” or “#tags“). This facilitates grouping, sorting and quick finding of the sets in the crop and task calendar. If #Tags have already been created in the crop, they will be adopted here.

Crop timing of varieties.
Once all the details have been entered, click on “create” at the bottom. The sets are created in the crop calendar. Click X to cancel set creation.
3.2 Crop Calendar Filter & Sort
![]()
Use the filter to sort the sets in the growing calendar. Select various criteria to display only certain sets. To do so, click on the funnel icon.
Sort the crop calendar view and/or set the filter according to your wishes. Select your criteria by opening the drop-down selection. To do this, first click on the down arrow on the right, activate the desired filter entries then and close the menu by clicking on the free space below the buttons.
Reset any filter option by clicking on the “X” next to the dropdown arrow.

![]()
If a filter function is active, the filter symbol appears in light green! To restore the default view, click on “Reset filter” in the filter window at the bottom right.
Close the sidebar window by clicking on the green “X” on the right.
Sorting is by date of sowing/planting by default. Sorting options are:
- alphabetically by planting set name
- by crop
- Harvest date
- Sowing/Nursery date
- Sowing and planting date
If you use any of the table columns for sorting your set list, the sorting option “table sorting” will be activated according to the selected column header.
Sorting the set planning: The light green filter is not activated, if all sets are still displayed and the view in the filter window has only been sorted differently!
Filter options are:
- From calendar week X to calendar week Y (CW), with limitation to nursery, sowing/planting, nursery/direct sowing/planting or harvesting
- Crop(s)
- Type of feeder (Heavy, Medium, Light)
- Planning status – display of all sets with/without bed allocation or without bed meters
- Variety assigned – Display sets with/without variety assigned
To filter by current week or year, click “This week”/”Entire year” buttons.
3.3 Edit the crop plan
Multi-selection mode: Selecting and deselecting different sets in the graphical overview can be done on the far left of the rows using the checkboxes.
Crop calendar overview.
3.3.1 Move sets – crop time changes via drag and drop
Moving sets to change time-periods: To move a set, click on a colored set bar. Hold down the left mouse button and move the set to the left or right up to the desired calendar week. All crop periods of the set will be adjusted automatically. Please be careful to click in the middle of a colored field to avoid accidentally changing.
Change crop times of sets: The crop time periods of a set can also be changed by drag and drop. To do this, click on the transition area of two color-parts using the left mouse-button, hold it and move to the left or right to change the period week by week.
![]() With the lock icon on the far right, the drag-and-drop functionality can be locked to avoid unintentional changes.
With the lock icon on the far right, the drag-and-drop functionality can be locked to avoid unintentional changes.
![]()
Set tooltip: Hold mouse pointer over a set name to obtain an overview of the set data. The tooltip shows the set and variety name on top, then number of plants and bed meters. Next the crop periods, followed by crop data, assigned beds, crop distances and nursery.

Calendar week statistics.
3.3.2 Calendar Week Statistics
Click on a calendar week number to open the week statistics. The selected calendar week is displayed in the upper left corner. Switch the weeks with the arrow buttons forward/backward.
In the case of the CSA type, the current number of member shares in this week is displayed to the right.
Below that, you can see the current weekly statistical data of the crop plan for the sets and planned areas.
In the tabs nursery, sowing/planting and harvesting all planned sets are displayed in the list with the corresponding cultivation period and specific data in the selected week. Summarized in one table, the All sets tab shows nursery, sowing/planting and harvest sets of the selected week.
3.3.3 Open set details
Click on the set name, or the colored set bar, to open the sidebar with the current set details. You can view and edit the data here. Clicking on a free space in the crop calendar window closes the sidebar. To change into the details of another set, click the next set-bar.
The sidebar shows the set name in the upper left corner. The name is linked to the crop master data. By click on the name, you get in the Crops-Section of the program to check or edit master data of the crop. Get back in the Crop Calendar by click on the Button in the Header.
On the right, the actions (delete set, copy to next year, create copy with continuous harvest, copy) can be carried out for this set.
![]()
The sidebar is divided into the four tabs “Set”, “Tasks”, “Notes & #Tags” and “Stock Change”. The tab “Set” contains the current data for the planned set. The “Tasks” tab lists existing tasks and new ones can be created. In the “Notes & #Tags” tab you can write down notes about the set. The “Stock Change” tab displays the inventory movement (input, output, reject) of the set and allows scrap to be removed using the “Delete Remainder” option.
3.3.4 Edit Set Details
![]()
The detailed view of the set contains all the planning data specified when the set was created. In addition, there are data and links for area planning if the set is already assigned to beds. These and other input values can be adjusted and changed here.
3.3.4.1 Set data
Crop timing: In the section crop timing, the starting time of crop, if applicable, direct seeding or planting and harvesting and the harvesting period in weeks are indicated.
Cultivation information: Here, the program automatically calculates the number of plants and the required bed metres. These values are intended to match the required harvest quantity and the planned delivery weeks from the crop information of the set. Alternatively, the number of plants and bed metres can be entered manually.
![]() After quantity changes to the set, the calculation can be updated by clicking on the calculator symbol displayed in yellow as a result. After the automatic calculation has been carried out, the calculator appears green.
After quantity changes to the set, the calculation can be updated by clicking on the calculator symbol displayed in yellow as a result. After the automatic calculation has been carried out, the calculator appears green.
Manual input of the number of plants or bed metres: If required, the number of plants or bed meters can be freely assigned when creating the set or, for sets that have already been created, these parameters can be changed in the set details. The calculator symbol on the right is then displayed in yellow and input field is outlined in blue. In the tooltip (hold the mouse pointer over the input field), you can check, whether the calculation was done manually or automatically and the calculation path.
A click on the calculator triggers the automatic calculation and replaces the manual input, the calculator symbol then appears in green.

Selection of a default bed length: Select half, whole or multiple of the bed length that is stored under Bed length (default) in Settings/Area parameters.
In the example the bed length (default) is 50m. To create a set for two beds, click on “2x bed length” in the selection menu and plan the set for 100 bed meters.
Use “Enter field planning” to switch on a selected field or plot and plan the edited set on a bed. By selecting a field or a plot in the dropdown-menu, you can go directly to the field view and, depending on the size of your set, cover one or more beds.
If the set is already planned on a field, the planned beds appear in the set sidebar below the selection field “Enter field planning”. Click on the field name to open the bed-view. Click the trashcan, to remove the set from the field.

Harvest information: Harvest quantities are to be indicated in the case of single harvest and per m² with the required harvest quantity per week (for farm type “CSA” per share and week). In case of harvesting of crops with recurring yield “per m²” and “per plant and week”, in addition to the required quantity, the expected harvest quantity per week must be indicated.
Harvesting methods: How is the crop harvested? Single harvest is set for a crop that can only be harvested once (e.g., lettuce, head cabbage – the whole plant is harvested in the process and is then gone), only unit pieces (pcs.)! With a single harvest per square meter, e.g., lamb’s lettuce is harvested (harvest unit in weight). One harvest per plant and week applies to crops that are harvested several times, with time interval in between (e.g., fruiting vegetables tomato, cucumber).
With the option diff. in delivery weeks, you can enter a different number of delivery weeks, which will be considered in the plant quantity calculation instead of the harvest weeks. The box only appears for single-harvest methods (plant is gone after harvest (single harvest and per m²), not for “per plant and week”)!
The option additional harvest amount is only available for operating system “CSA”. An additional harvest quantity can be planned in addition to the CSA quantity enabling this option.
Plant spacing: The information on “Plant spacing” includes the distance in the crop row, the distance between rows and the number of rows on the bed.
Details: Data of the set consist of the variety information, the type of crop (whether the crop is sown, nursery grown on the farm, purchased from a transplant-grower or grown for sale of the transplants).
A percentage safety margin can be specified for the estimated loss during the crop period in the “Security”-field. This is added to the total number (minus loss) when calculating the number of plants. If the cultivation type “nursery” is selected, the germination rate of the seed must also be entered in %.
Nursery information: When growing transplants on your own, specify the standard size of the multi-pot plates and the number of seeds per multi-pot. For example, for lamb’s lettuce in a 4-count press pot (150 pots per box), 150-count multi-pot plates should be specified with 5 or 7 seeds per pot. For pot crops, (e.g., basil), multiplate size = 1 and 10 seeds per pot can be indicated.
3.3.4.2 Tasks
![]()
The Tasks tab lists all crop tasks associated with the set, that was created under Task Templates in the Crop System. Sowing and Planting or Growing and Planting tasks, are created automatically from the set, cannot be deleted, and are always displayed.
![]() Create a new task for the set by clicking on the “Plus” sign.
Create a new task for the set by clicking on the “Plus” sign.
With the “trash can” button you can delete all tasks you have created yourself.
Each task contains an overview of the set next to the date and name. A click on the line of the task opens the task editing window.
3.3.4.3 Notes and Hashtags
![]()
Note field: Click in the field to create an entry. The field saves automatically. If a note exists, a blue info-sign “i” is displayed on the tab.
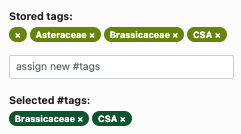 Create/assign hashtags: By clicking on an existing #tag, you assign it to the set. A new #Tag is created by automatic assignment, by entering it and confirming, pressing Enter.
Already assigned #Tags appear in green. You can delete them with a click on the small X on the right of the name. Under #Tags from crop the #Tags are indicated, which are deposited in the crop master data. These #Tags, shown in blue background, can be deleted also only in the crop master data, however not at the set.
3.3.4.4 Change in stock
![]()
All receipts and issues of the deliverable harvests and the rejects-quantities are recorded in the Stock Change tab.
The upper “total” table shows the summed values of the set from the lower table. The columns from left to right contain the A-stock (Available stock = Deliverable), Input (Harvest entries), Output (Deliveries) and Reject (Remainder deleted).
Delete remainder: If the remainder of a set’s stock goes to compost, the quantity can be deleted from the set’s inventory here.

Handling and deletion of remainder.
Select the deletion date in the date field and enter the reject quantity. Click on the green tick to carry out the deletion. The deleted quantity will now be listed in the inventory change list in the right column “reject” on the specified date. The quantity can be corrected in the list (click in the field and change the value) or if accidentally deleted, it can be brought back into the inventory by using backspace and delete the scrap quantity from the field. The correction of the input/output must be made in the corresponding harvest entry/delivery.
The stock change table (below) contains the input, output and reject with the execution date.
A filter option can be found on the right above the table, for clearly displaying certain columns or time periods.
3.4 Actions on planned sets and bulk processing
Using set actions, you can copy or delete planned sets or modify them using several options. Besides editing already planned single sets (as described below point 3.3.3.), you can also multi-process several sets at once (bulk processing).

Actions on multiple sets (bulk editing).
Chose sets for modifications: In the graphical growing calendar view, click on the checkboxes at the beginning of the row and now select the records to edit.
Select/deselect all sets: Click in the top box. Select several contiguous boxes: Check the desired topmost record. Now click the lowest record to be selected while holding down the SHIFT key. All records in between will be selected.
![]()
 Click on the 3-dots icon. The set actions sidebar opens. If no sets are selected for editing yet, “0 sets selected” is displayed at the top. If there is a number there, the corresponding sets have been selected.
Once the desired sets are selected click the button for the action to be performed.
Delete sets: To delete one or more sets, select them and click on the “trash can”-icon. Confirm the security prompt. The action cannot be undone!
Copy to the next year: Mark individual or all sets and click “Copy to next year”.
Plan for a continuous harvest: Create set copies of one or more selected sets which harvest period(s) follows that of the source set(s).
Copy selected sets: Create an exact copy of one or several sets, the automatic enumeration of the sets will be adjusted accordingly.
Recalculate sets: Number of plants and bed meters of marked sets are recalculated.
Other general actions are: round up/down growing plates or plant boxes, move sets, change growing periods or start week day.
Other actions: Under “Change values for multiple sets” further actions can be (de-)selected for all set data. Compile frequently used actions individually and apply them to your sets.
3.5 Quantity planning
In addition to the graphical cultivation calendar (bar chart view) and the table overview, the quantity plan represents a further visualization option for the data. It can be used to create a quantity plan at the beginning of the year in order to calculate which quantities must be available for the planned number of customers and must be grown as sets on the beds. By clicking on the field of a customer in the corresponding calendar week, a planned quantity can be entered. For each crop, the already planned sets are also displayed. There you can check whether the desired quantity of the crop can already be delivered to the customer in the planned week or whether further sets must be entered for the season in order to achieve the quantity.

Quantity planning for customers given the already planned records.
In the above example, you can see that in the first two planned delivery weeks, no sets have been planned yet and therefore the expected quantities (3kg in the first delivery week and 5kg in the second delivery week) for the customers will not be reached. Only in the third delivery week the planned set even yields more quantity than needed. To change or delete a set, click in the corresponding field or click on the set name to edit the set details in the sidebar.
In the set details, you can specify whether you already deliver this set during the planned harvest weeks (cut) or whether the harvest quantities are subsequently delivered in deviating delivery weeks, as is the case for “stock” vegetables, for example. As soon as you change the setting between “cut” and “stock”, your previous delivery weeks will be overwritten.
The quantities are evenly distributed over the entire number of harvest weeks, so with a delivery period of 10 weeks in total and a planned total harvest quantity of 100kg, you can deliver 10kg per calendar week. If you plan to deliver a storage vegetable only every two weeks, click on the corresponding calendar weeks, these will be automatically synced to the representation in the quantity planning, and the quantities are distributed evenly once again. Please also consider that shifts at the set or e.g. shortening the harvest weeks due to dire weather conditions of a set has direct effects on the quantity planning, since the data changes are taken over synchronously.
Tip: To deliver a crop in different forms, for example, young carrots as “bundles” and later as “stock carrots kilo goods” enter them as different crops, e.g. carrot (kg) and carrot (bundle), then the quantities within each category can be easily added and you can flexibly plan your goods for different customers depending on variety and availability.
Using the menu bar, you can directly create additional required sets and filter them by customer. The filter with search bar on the right side of the menu can also be used to narrow down by crop, type of crop and plant family.
![]()